So you have created the nice new skin that you have been looking to use with your DNN site, but you don't know how to set it up to upload to your site. Well the process is actually very simple if you follow the below steps.
Folder Setup
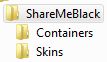
Before we start to make the skin package we need to ensure you have the files in a proper format. To accomplish this, all files for the "Skins" must be inside of a "Skins" folder. You will also want to include all files for the "Containers" within a "Containers" folder. Your directory structure should look like this. (where ShareMeBlack is your skin package name).
Packaging of Skins and Containers
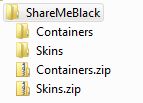
Now that you have your files arranged in an appropriate manner you will want to go inside each folder and zip all files. You will be creating two individual zip files, Skins.zip which contains all files within the Skins folder and Containers.zip which contains all files within the Containers folder. When creating these zip files you CANNOT just send the whole folder to a zip file because all files must be in the root of your zip archive.
Once you have created these files I typically copy them to the root of my skin folder, so my new file structure looks like the below.
Packaging for Upload
Now that you have the skins.zip and containers.zip files, you can simply zip each of these into a single file named XXXX.zip, where XXXX is the desired name of your skin package. When DNN loads the skin packages, the name of the outside zip file dictates the name of the package as displayed in the skins section of your DNN portal.
Uploading
You can now upload your skin package just like you would any other skin, via the Host -> Skins section, choosing "Upload new skin".
I hope this has helped provide a quick overview showing you how to package your newly created skin.