A question I have been asked many times recently is how do you debug a DotNetNuke module that has been developed using the WAP (Web Application Project) development model. This is a question that I have known the general answer to for quite some time, but I have never actually had a need to truly debug one of my custom modules. During the course of helping a client with an issue today, I actually took the time to document all steps necessary to debug a WAP DotNetNuke Module within Visual Studio 2005. This article will walk you through all steps necessary to debug your project.
Prerequisites
Before you can debug your application we must be sure that you have a proper environment for this testing. First, you must have Visual Studio 2005 installed on your machine. Secondly, you must have DotNetNuke installed and running via IIS, you must also ensure that the ASP.NET worker process is STILL active before continuing with this process. The best way to ensure this is to simply navigate to your homepage. The last requirement is that you have successfully installed your module manifest and have added the module to a content page inside your development environment.
A few additional notes, you do NOT need to modify the debug settings in the DotNetNuke web.config. You will, however, need to build your module as a debug release, but we will talk about this later.
Configuring Your Module
The first step to allow debugging of your module is to properly configure and build it to allow the debug process to occur. Below I will show you how to set a breakpoint and ensure that you have built the module in DEBUG mode. Please note this article assumes that your VS solution is properly placed where your bin directory is updated with the new .dll file as soon as you re-build. If you are on a non-standard development environment you will need to modify this process accordingly.
- Set the breakpoint. This is a very common step for any .NET developer simply click in the gray area to the left of your code window. A red bullet point should appear and this line of your code should now be highlighted in red as in the below picture. This sets the starting point for the debug process. When this line is reached, processing will go into the debugger.

- Ensure Debug mode set. In the toolbar, area ensure the Debug is set as the solution configuration, as in the below image

- Build the solution. From the build menu select "Build Solution", ensure that the build completed successfully
This completes the setup of your module to allow debugging to occur. Next, we will attach the debugger so you can step through your code.
Attaching the Debugger
In this step, we will actually debug the running DotNetNuke module. The instructions in the following steps are based on the usage of a Windows XP PC. If you are running on a different version of Windows the ASP.NET process name might be different than this example.
- Inside Visual Studio with your project still open, select "Attach to Process..." from the "Debug" menu. You should see the following screen.
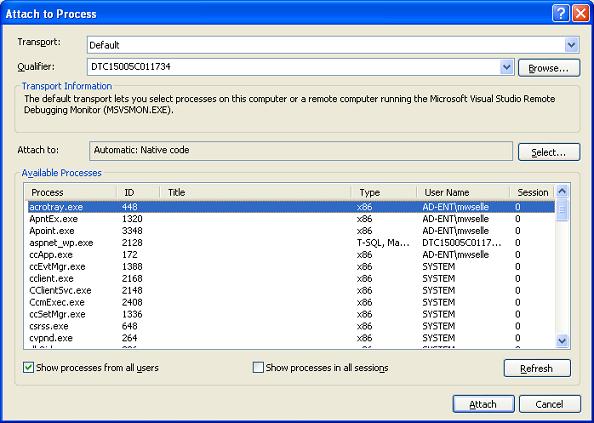
- From this list, we will want to find the ASP.NET worker process. In our case, this is the "aspnet_wp.exe" process. Simply press attach and the debug process will start
- Now you may navigate to your module and when the breakpoint is reached processing will switch to the debugger just like any other application

- You can stop debugging when ready using the standard procedures.
A few things that I noticed when using this method to debug DNN. DNN will run much slower than normal due to the additional processing that is going on. This is normal please be sure to allow the processes to finish. As part of this, the time to switch over to the debugger when stepping through your code can be a fairly long wait, in my case, it was 45 seconds into page load before the VS debugger gained control of the process.
Conclusion
I hope this article provided you with a quick overview of how you can debug a DotNetNuke module developed using the WAP method. If you have comments about this article please share them below, if you are looking for assistance troubleshooting an issue please use my forum available from the links to your left.