For the past year or so I have been using Azure DevOps (Formerly VSTS) to help improve the processes, procedures, and stability of all of the projects that I work on. Our team is not overly large, but we have been working to modernize our processes and to introduce solid procedures, including documented code reviews and systematic deployments. A while back we finally bit-the-bullet and migrated our source control over to Git from the TFVC which we had been using for a little over 6 years. With that done, branching strategies, pull requests, and automated deployments become easier to envision. However, to get a true, full CI/CD setup created It took many hours of research, playing with settings, and phone calls to friends for advice. With that behind me, I thought it would be nice to share the setup, end-to-end, in hopes that it might help others.
Warning: this is going to be a long post, but my goal here is to provide the "whole story" rather than just a piece of it!
The Goal
Before I walk through the process I want to discuss the goals of this process as we saw them. In this post we are exploring the solution for ASP.NET Core applications, all of our applications using .NET Core also utilize Entity Framework Core for their database backend. With our CI/CD pipeline, we wanted to achieve the following goals.
- Each build should increment a version number, and properly include this version # in the assembly files
- Development should follow a simplified approach similar to GitFlow whereby we have a master & develop branches for Production & Development environments and developers introduce code using feature branches
- Pull-requests to merge feature branches, or develop -> master should require approval as well as validation of a build, with unit testing
- Unit Test Code Coverage with XUnit should be reported in the builds
- Releases should be automatic to the development environment on a successful update to the "develop" branch
- Releases should be queued and pending approval to be released for successful updates to the "master" branch
- Releases should properly patch appsettings.json files for the target environment
- Releases should update the database in the respective environment
Disclaimer
The information shared in this post represents a fully working solution that I have tested with multiple applications. The information shared within is accurate and current as of October 8th, 2018, however, due to the dynamic nature of the Azure DevOps world it is possible that items will change.
For this we are also assuming that you already have a Git repo configured and have at a minimum a master & develop branch created.
Build Pipeline Configuration
The first step is to create your new build pipeline. To do this within your Azure DevOps account navigate to "Pipelines" -> "Builds" and select "New." On the first step of the process, you can simply select the .NET Core Template and configure your Git repository as the source. We will configure this in the following steps. Your end results will look similar to the below.
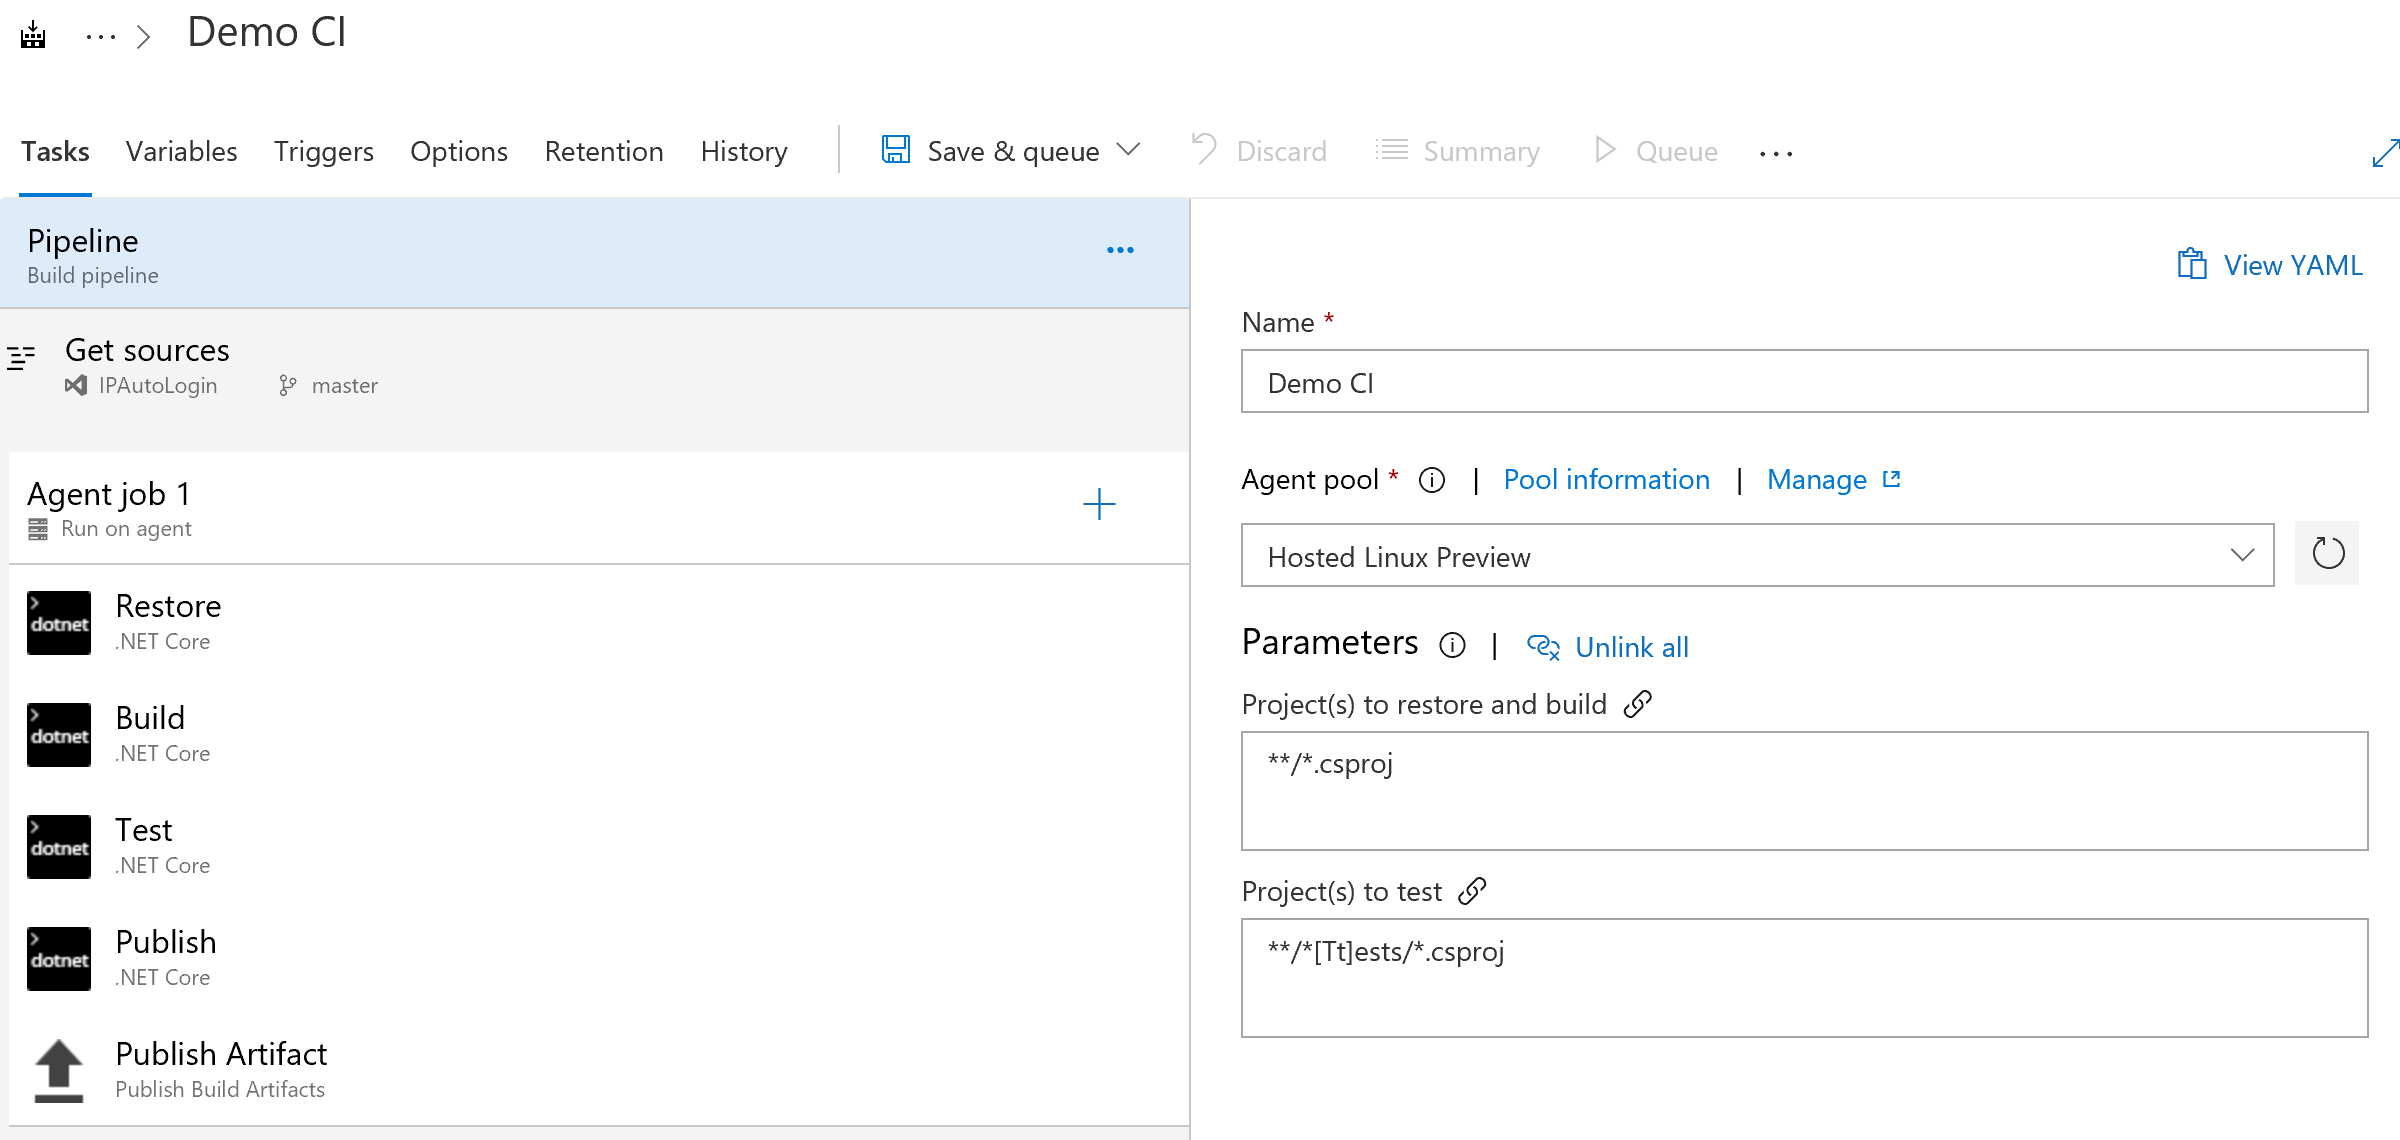
Properly Setting Tasks
Although this template is pretty well configured, we want to be sure to configure the tasks to match our needs. The default template relies on the build agent to have the proper .NET Core tooling installed, which if staying current and using the Hosted environments it is not a given. Additionally, the default task listing does not contain any provision to update the version number of your application.
Add an Assembly Info Task
Starting with the default, we will want to add a step to the process, at the very top. The goal of this step is to set the version number in our projects to the version number specified by our build. To accomplish this we click on the "+" icon to add a new task. The task that I have used is called "Assembly Info" which is a free utility. At the time of this writing, I was not able to find any default tasks that do the job. Once the task has been added it will have a number of settings, you want to focus on the following.
- Display Name: Set this to something helpful
- Source Files: This should list the names of each of your .csproj files.
- File & Informational Version: This should be set to "$(Build.BuildNumber)" without the quotes.
You can additionally set copyright or other values as necessary, but these will be the primary items. Once configured this task should be moved to the top of the phase to ensure the patching is done BEFORE the compilation.
Add .NET Core Tool Installer Task
We need to add an additional task to the phase to install our desired set of .NET Core SDK to ensure we are current. You can do this by again selecting the "+" option and searching for .NET Core Tool Installer. Once added to the project, place this right after the Assembly Info task.
The only configuration for this element that should need to be modified is the "Version". We are currently using 2.1.402 for our projects, but you might need a different value depending on your setup.
Replace Test with VsTest
The out of the box configuration will properly execute your Unit Tests, but it will not report test success/failure into the Build Pipeline results. To get around this we remove the "Test" step from the template and replace it with Visual Studio Test. This is done by selecting "+" and adding "Visual Studio Test," it should be placed after the build step, but before the publish.
Once added the only configuration change needed from the default is to check the box for "Code coverage enabled." With this step completed all unit tests will still run and code coverage information will be reported to the results.
Create Migration Scripts
Once our build is completed, we want to create a deployment script for our migrations that can be used later to update our database. We can accomplish this by running a command line statement asking dotnet to create an idempotent script. This is a script that can be executed regardless of the status of the database environment.
We will again use the "+" button to add a new task, this time we are looking for a "Command Line" task. Once this is added, you will want to input the following command.
dotnet ef migrations script –p
$(Build.SourcesDirectory)\[PATHTOPROJECT] -o
$(build.artifactstagingdirectory)\migrations\scripts.sql –i
Be sure to replace [PATHTOPROJECT] with the path to the project FOLDER for your application that contains the migrations. If you have any other command line parameters that you typically use, such as a startup project, be sure to set those here as well. In the end, this step will call EF and generate the script and drop it into the staging directory for artifacts.
Add Script Artifact Publish
The final addition to the Task pipeline is an "Publish Build Artifacts" task to move the generated script to the artifacts for later usage. Simply select "+" to add the new step, and once added the only configuration will be to set the "Path to Publish" which should be $(Build.ArtifactStagingDirectory)/Migrations and the name of the artifact, which can be whatever you desire.
Final Task Listing
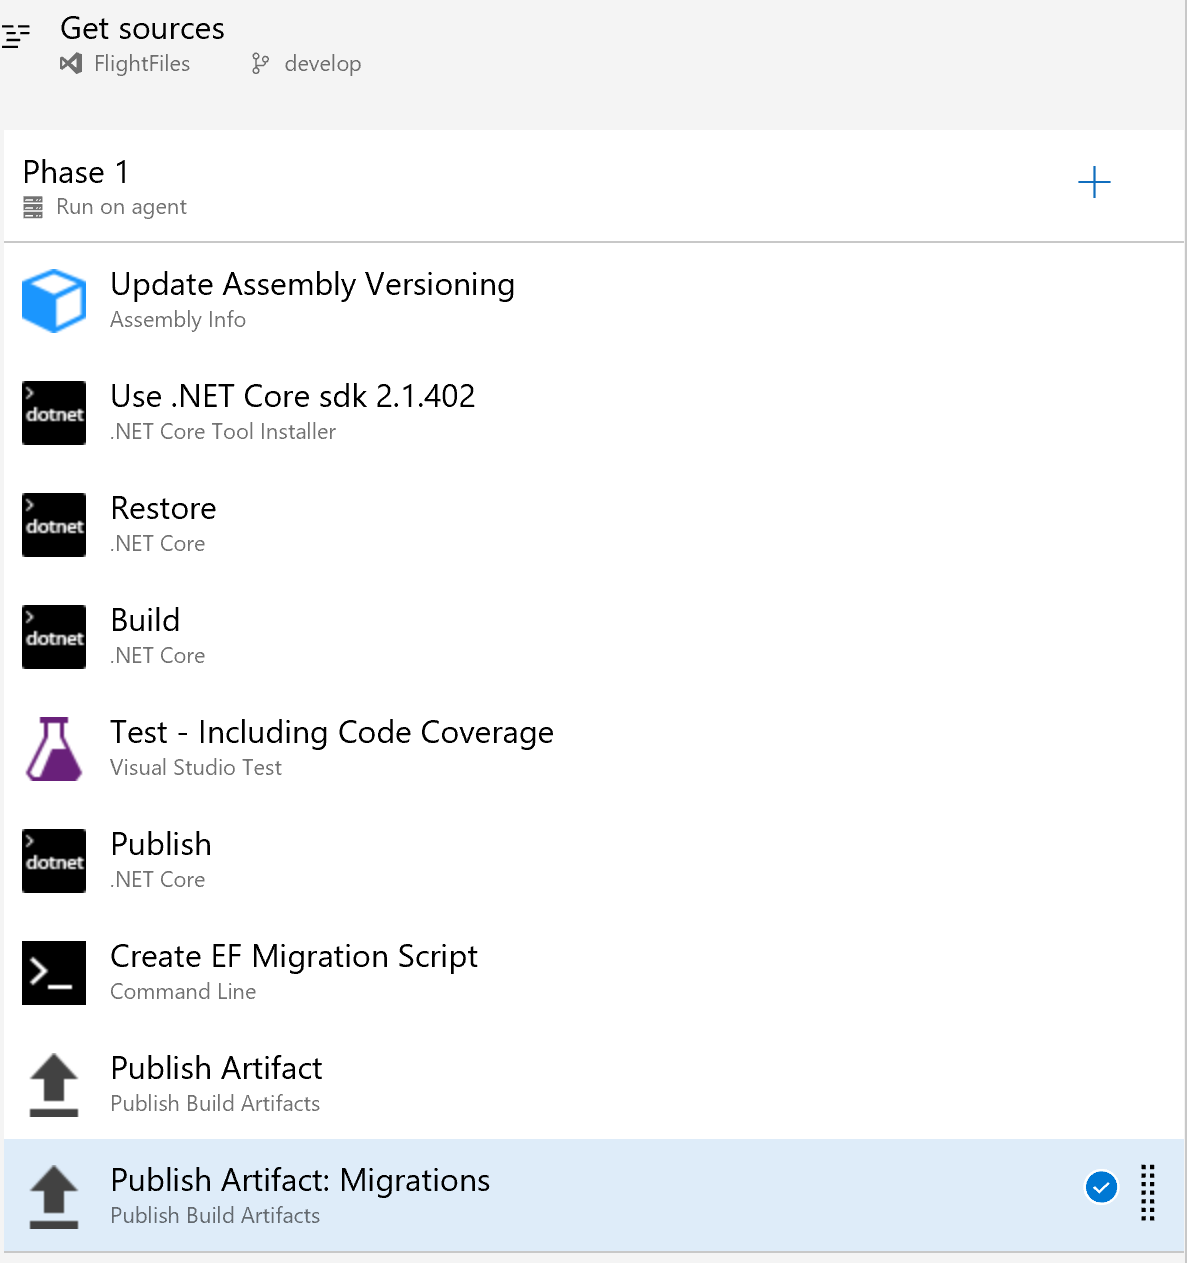
With everything configured properly in the tasks section, you should see a display similar to the above.
Variable Configuration
With the build steps configured, we need to update the variables for our build to properly set the Major and Minor versions. We will use these values combined with the automatically incrementing build number to create a full version number of Major.Minor.Build.
On the variables screen simply add two variables "MajorVersion" and "MinorVersion" and set them to your desired value. You can use this section to define any other variables you may need.
Triggers Configuration
On this section you will want to ensure that Continuous Integration is enabled and add two "Include" options to add the Develop & Master branches. This will ensure that the build is triggered automatically anytime a commit happens to these branches.
Options Configuration
The options screen allows you to configure metadata, view build status images, and other items. You can adjust those settings at your leisure, the key setting we need to change here is the Build Number Format. We want to set this value to "$(MajorVersion).$(MinorVersion)$(rev:.r)" without the quotes, which creates our version number that will have all of the parts necessary.
Save & Test
You can also configure your retention policy as needed as well, however, that is outside of the scope of this post. With all of this done you can select "Save & Queue" to store your Build Pipeline. Once this is done a build will automatically be queued on the default branch. You will want to wait for this to complete and validate a successful build.
Configure Branch Protection
Once you have validated your Build Pipeline we want to enforce the usage of the build pipeline for any commits into our develop and master branches. This can be completed by navigating to "Repos" -> "Branches" next to each branch under "More Actions" select "Branch Policies" which will open the following page.
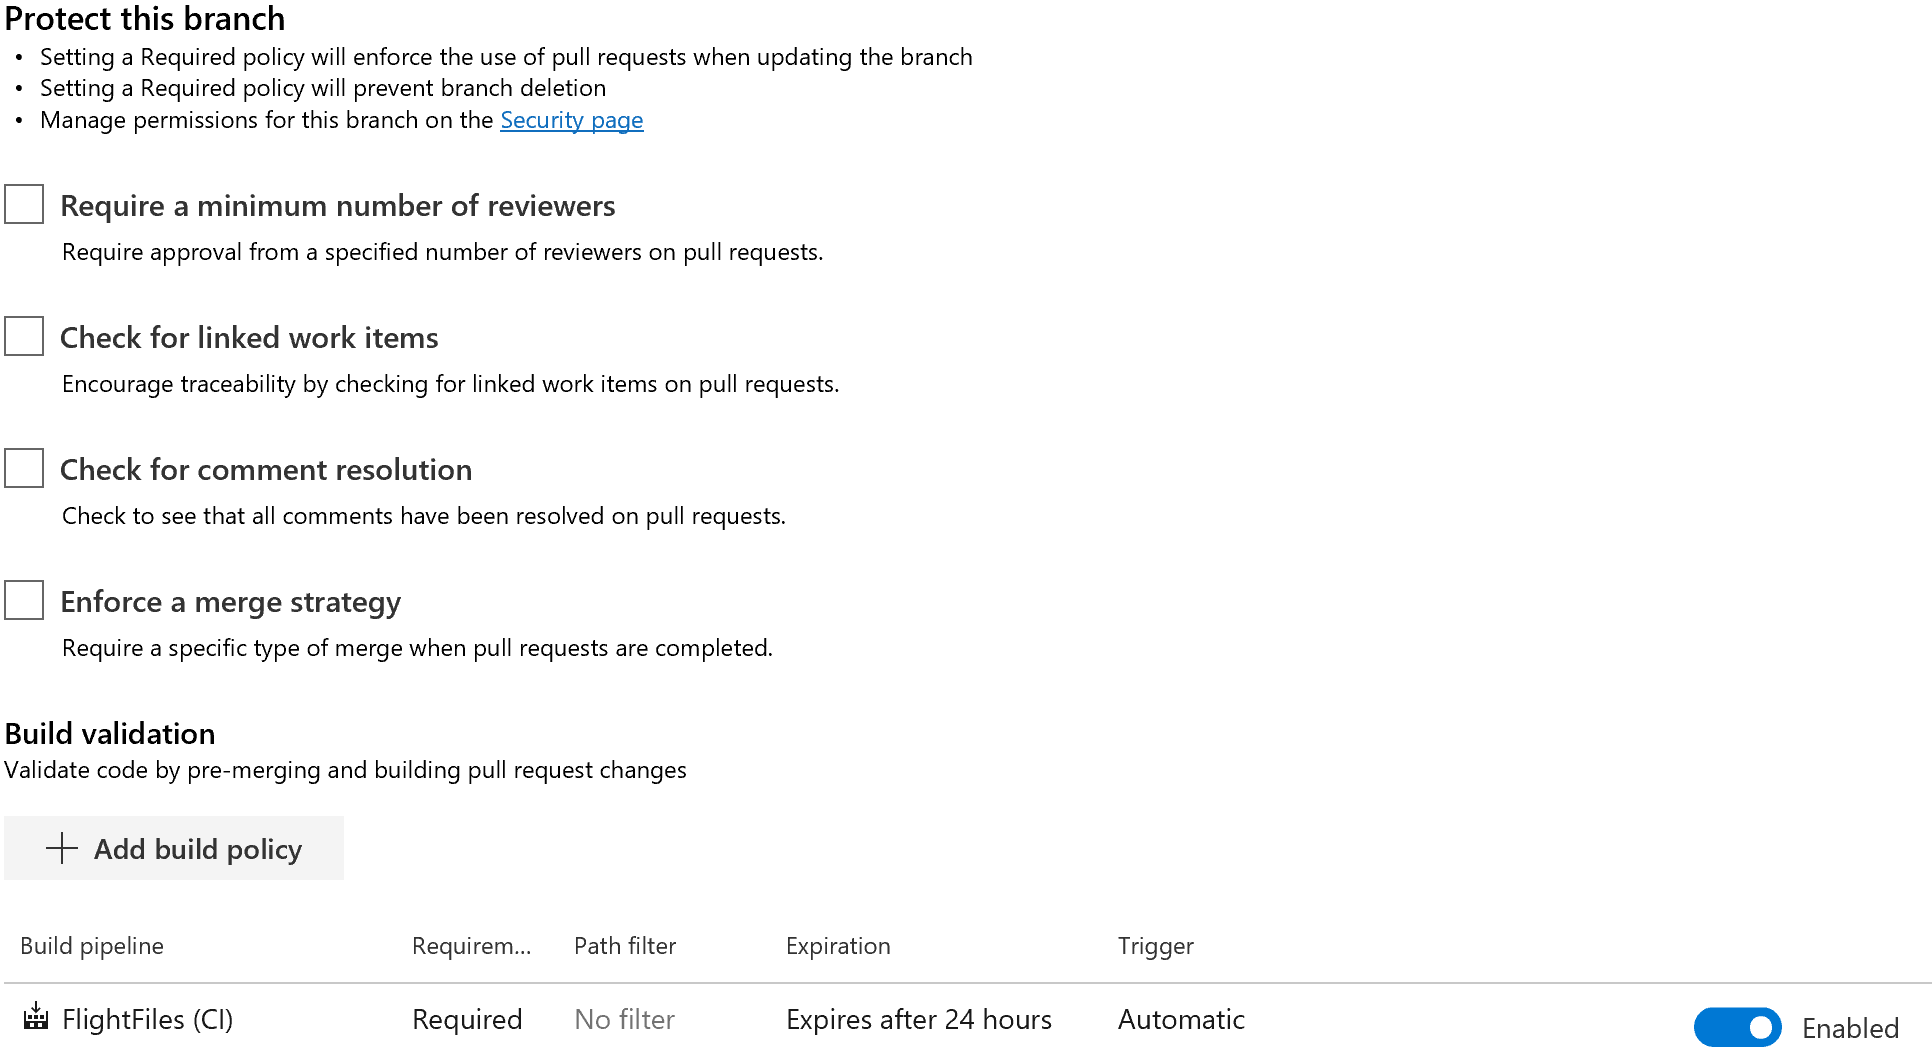
On this page you can set rules for the number of reviewers, resolution of review comments, the association of work items, and required builds. You will want to select the "+ add build policy" option to add a policy requiring a successful build. This is a hard requirement once enabled and users will NOT be able to complete a merge if a build fails.
Procedurally after enabling build policy protection when a user creates a pull request a build is immediately triggered and its status will show on the pull request review page. For multi-person teams, this workflow is fantastic as the reviewer will know build status when they are reviewing items, they can even click into the build status to see Test Reports etc.
Note: be sure to configure branch policies for both master and develop branches.
Creation of Release Pipeline
Now that we have created a successful build pipeline and enabled branch protection to ensure the quality of merged, we can move on to creating our release pipeline. The goal of these pipelines will is to auto-trigger a release on the successful build of the develop or master branches. Additionally, the release process should properly configure the application for the target environment(s) as needed. The below image shows the final state deploy for our configured Release pipeline.
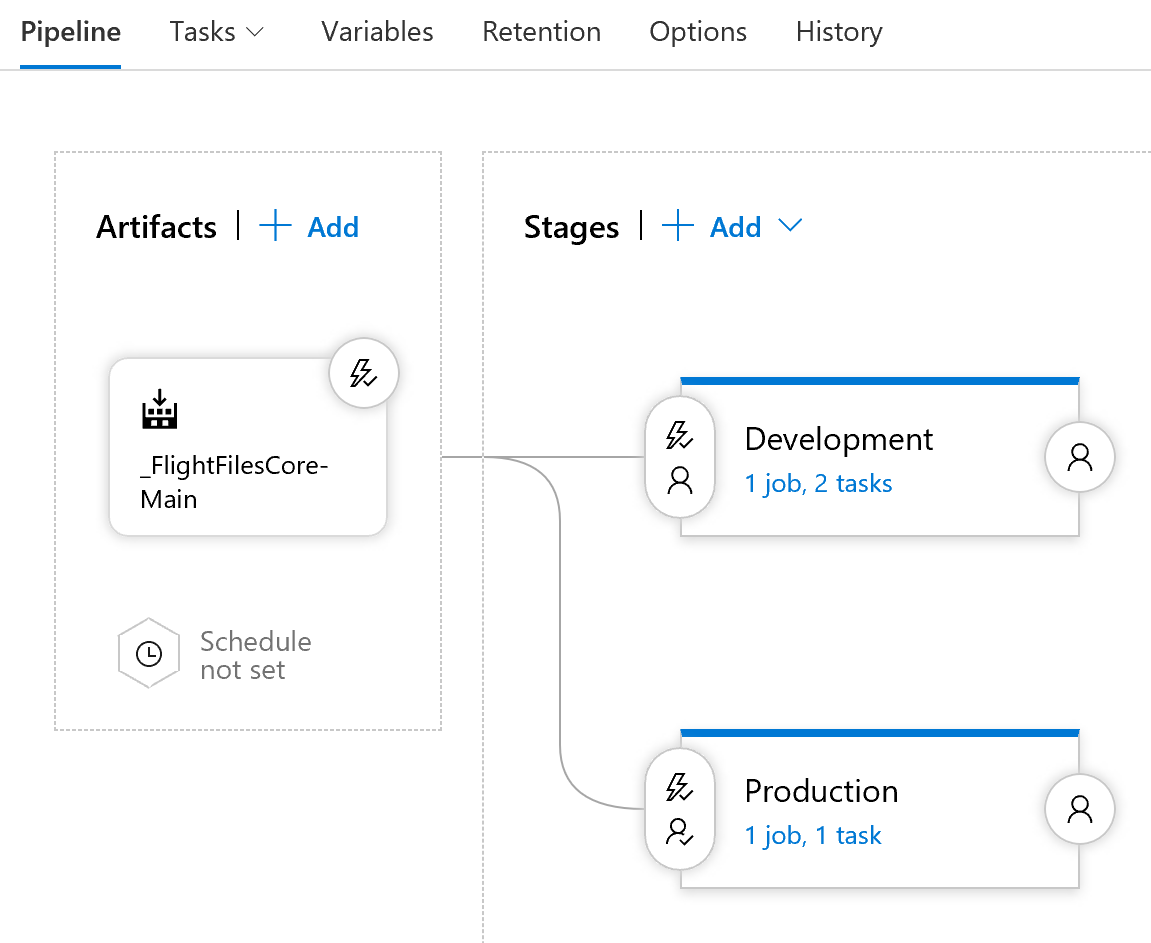
Create the Base Pipeline
You can start by creating a default pipeline and select your previously created build as the source for the artifacts. This will create an initial setup with your artifacts as the source. Click on the "Continuous Deployment Trigger" option in the upper right corner of the artifacts section. Here you will add two build branch filters to include only develop and master. This ensures that a release is not created for any feature or other branches that might get created.
Create & Configure Stages for Deployment
In our configuration we are creating two stages of development, one for development and one for production. Builds targeted to develop will be deployed to the development stage, and those targeted to master will be deployed to production. We will walk through the creation of one of these stages, the other can be added by repeating the steps herein.
Our deployment is to Azure App Service so we simply can select "Add Stage" and from the "New Stage" option we can select Azure App Service as the option to get a leg-up on the configuration. Once selected you should see a single stage to the process for an app service deploy, simply work through the configuration settings to specify your app service and the target deployment. When reviewing the settings look for the "File Transforms & Variable Substitution" section and under the JSON variable substitution setting add appsettings.json. This will tell the step that it should use the "Variables" configured for the release pipeline.
Addition of SQL Deploy Script
The final major configuration is to add an Azure SQL Database Deployment step after the App Service Deployment. Once added you will want to fill out the App Service connection information, once the basic information is added select "Publish" as the action and "SQL Script File" as the type and for the script itself use the "..." option to select the .sql file from the artifacts of your build.
Since we created an idempotent script during the build process, there is not a risk of damage if we run this at each deploy.
Configuration of Pre-Deployment Conditions
Once you have configured the environments we need to configure the pre-deployment conditions for each of our environments. In our case, we want to specify that a release to development is only done if it was a commitment to develop, and a release to production is only done if it was a release to master AND after approval.
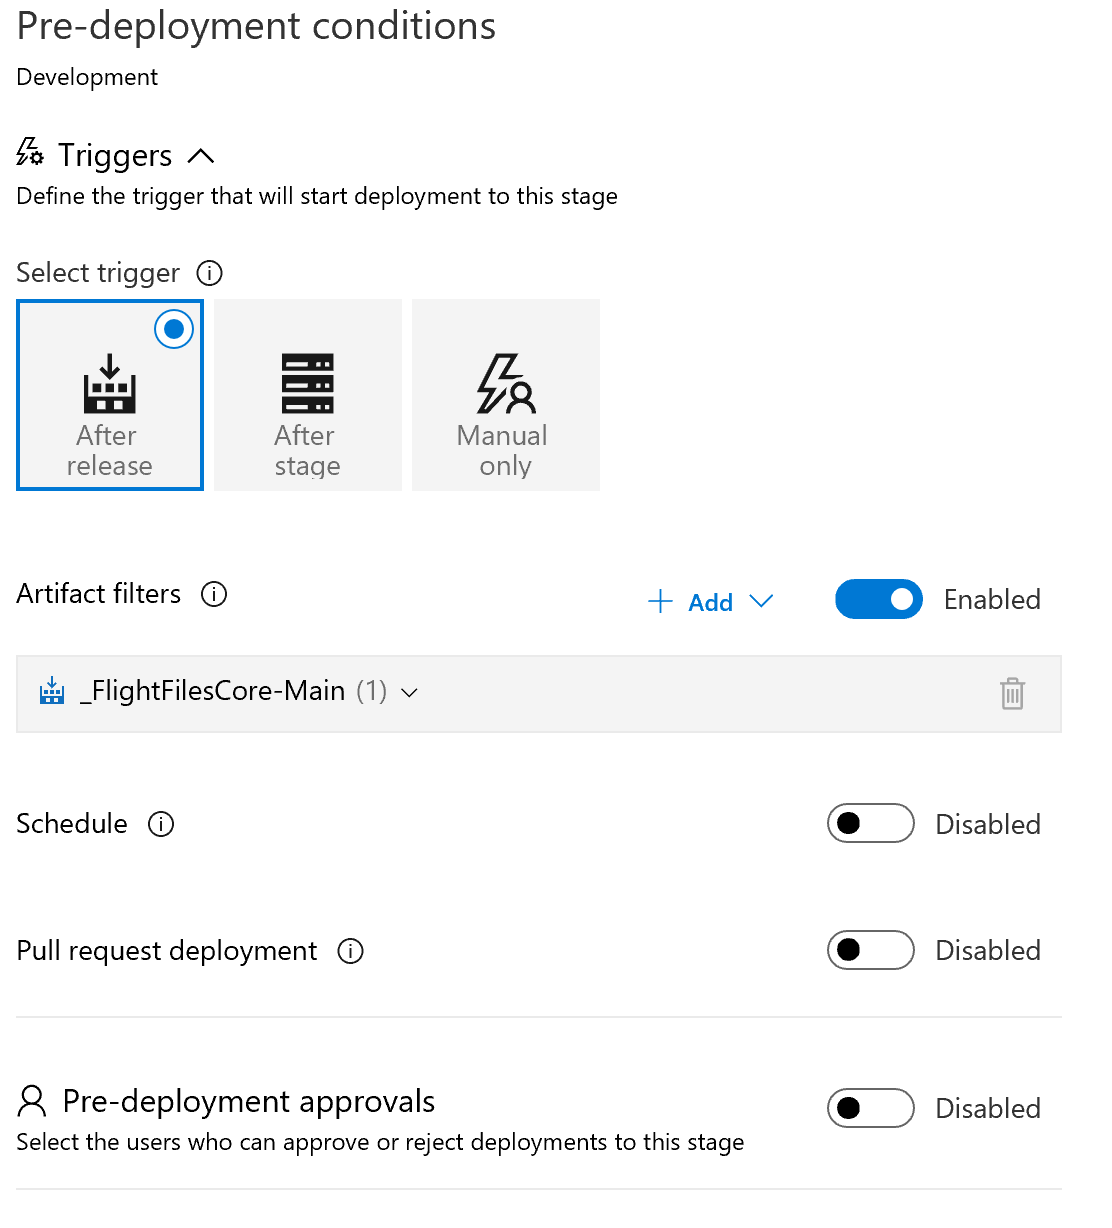
As you can see from the above, it is easy to simply select "After Release" and enable artifact filters. Once selected just select the branch to include. If you prefer an approval before, simply turn that setting on as well and you will have the needed protection.
Configure Variables, Retention & Options
Once you have configured your stages, set the conditions for release, it is time to set up any variables you need. The exact configuration here will be dependent upon your application. You can use a variable name of ConnectionStrings.DefaultConnection for example to update your connection string if using the default name. You can also limit variables by stage so you can substitute one value for development and another for production.
As with the build process you can additionally configure retention strategies and setup basic options for the Release pipeline. My only other modification to the defaults is to change the Release name format to "$(Build.BuildNumber)-Release-$(rev:r)" allowing the build number to be carried over into the release name.
Review
With all of this completed a developer can make a change, create a pull request, see a validated build. Once the pull request is approved, it will trigger a build that updates the development environment. If a change is made to master, it will trigger a build that once ready will require approval for deployment. Overall a great process.
There is endless configuration available to help streamline the procedure to work with different models. For example, you can do staged deployments that move things from development -> staging -> production just as easily as the simplified process I've outlined here.
I hope this was helpful and would love any comments/suggestions for future articles of this type in the future.