Just a little over 24 hours ago a Microsoft Azure datacenter experienced an extreme outage. For those with hosting primarily inside of the South Central US location, it resulted in outages lasting from between 8 to 20 hours, with a few select sites still impacted as I write this. There is a common misconception that if you are in the cloud you are ok. This isn't exactly true, the configuration and deployment of your application within the cloud will be the final determining factor of your stability. It is one thing to be secure/stable with Geo-Redundant backups but is a whole different story to be Geo-Redundant Availability wise. In this post, I'll look into what it takes to be truly Geo-Redundant in Azure and why it is often overlooked.
What is Geo-Redundant Availability
Before looking into the specifics, it is important to ensure that we have a common understanding of what we are discussing here. We are discussing Geo-Redundant Availability which is a situation where your application is physically hosted in two different data centers. Microsoft provides a great high-level overview of this in their Multi-Region Web Application guide. The below image was taken from that article for illustration.
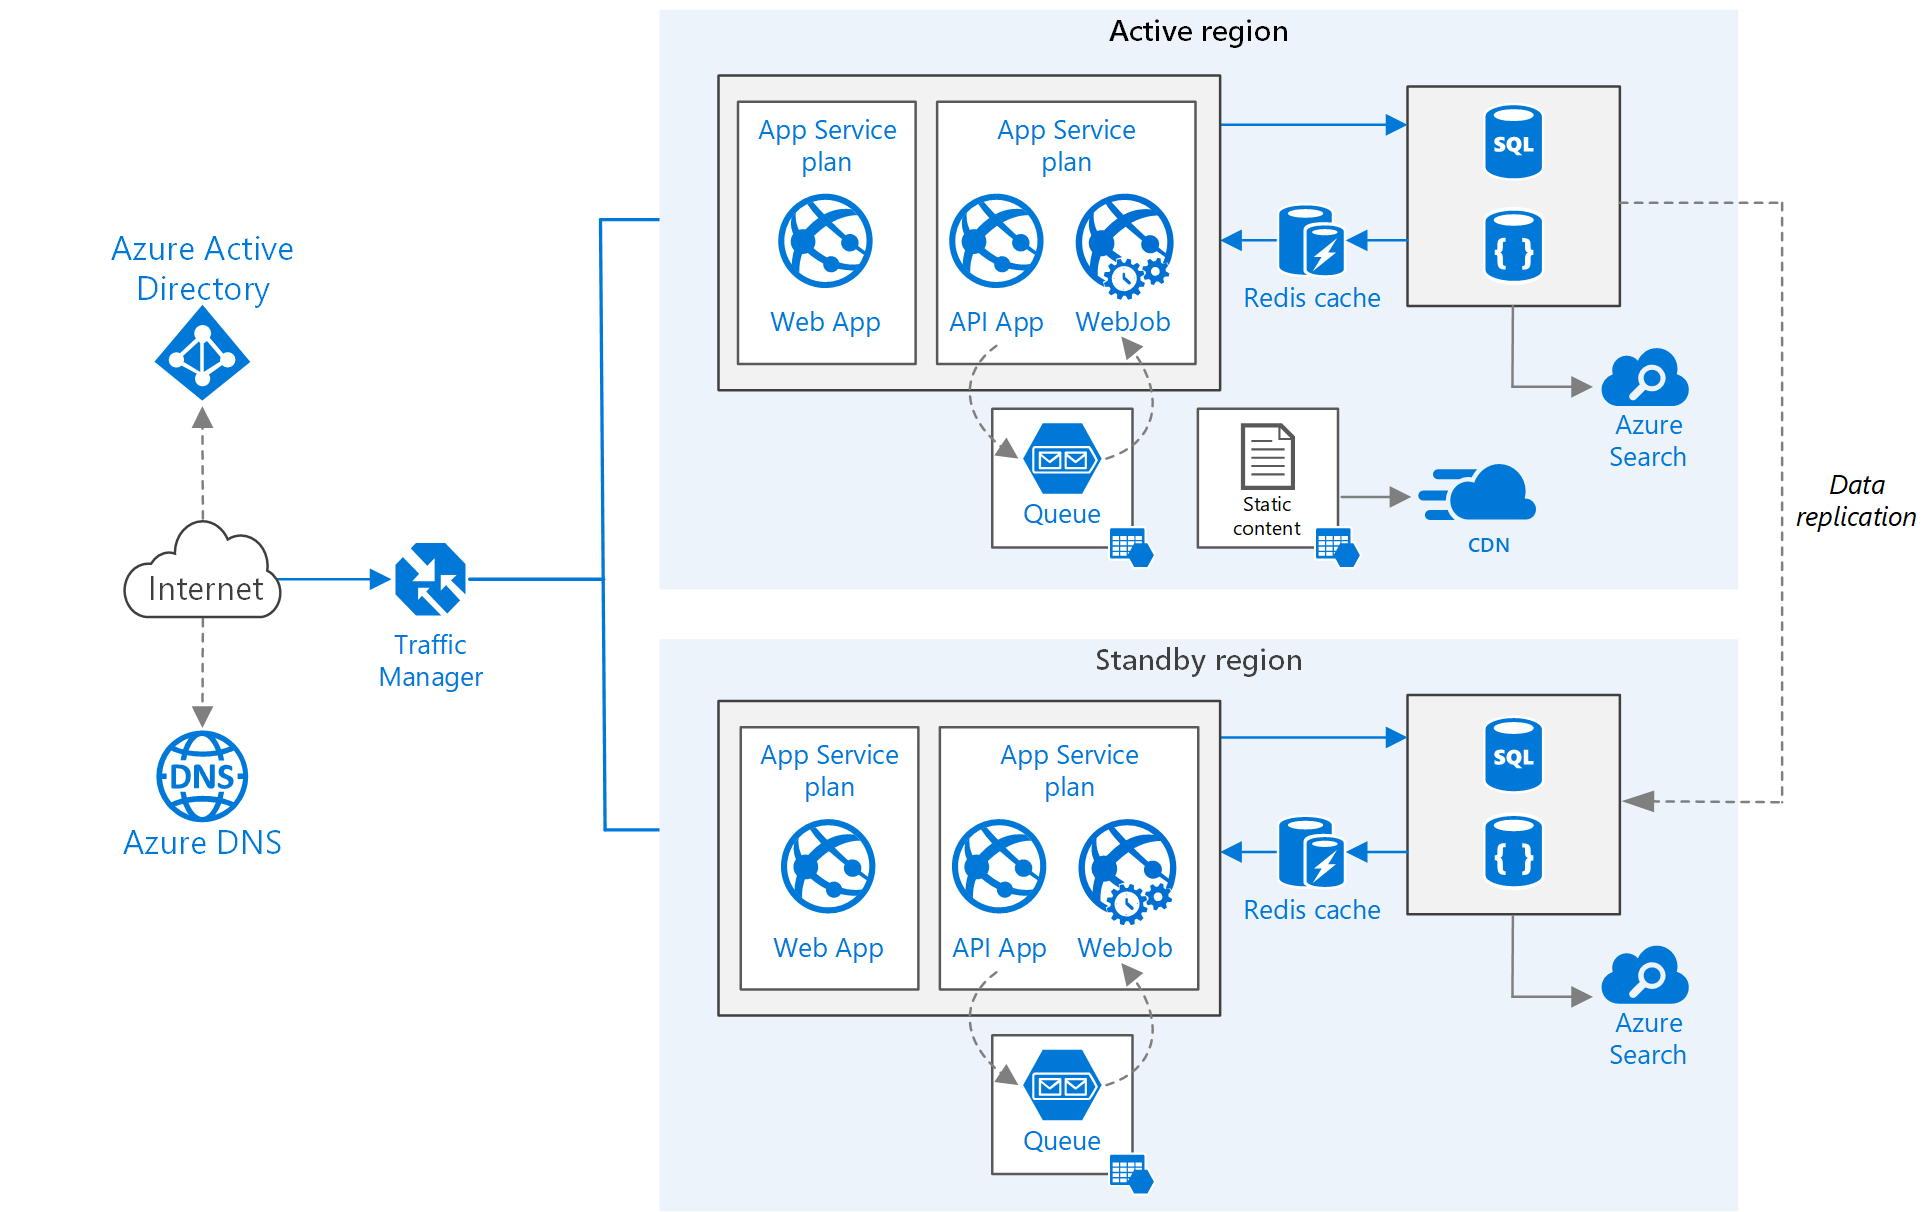
As you can see in this diagram it will utilize an Azure Traffic Manager instance globally, and then we have duplicated infrastructure for the application to host the application. In this article, Microsoft discusses three different strategies that can be used to manage this type of architecture.
Active/Passive with Hot Standby
This infrastructure is the most common target that I see implemented for those looking at Geo-Redundant availability. In this layout, one region is the "Active' region and all traffic is routed through Traffic Manager to the active region. The secondary region is online at all times, however, it does not take any traffic in standard situations. Should the Active region stop responding to the Traffic Manager it will automatically direct traffic to the secondary region, with little to no delay.
This achieves a great balance in complexity and uptime.
Active/Passive with Cold Standby
This infrastructure is similar to the one above, but the standby systems are not all fully operational all the time. In the case of VM's or other items, it is possible to either have them scaled-down or even possibly offline. A failover in this situation would require manual efforts to bring the other region online and then failover after all items are online. This will save some on monthly costs but will cause delays in restoring services.
Active/Active
This infrastructure is the most complicated in some regards as it will keep both systems online at all times, with Traffic Manager balancing the load between the regions. There are great advantages here as you can benefit from all of the resources that you are paying for, but not all applications can support this model.
Implementing Geo-Redundant Availability
As much help as the Microsoft documentation is there is a lot of steps that are left out, so I'll try to walk through the process here and illustrate exactly what it takes to configure an application for Geo-Redundant Availability.
For the purposes of this post, we will be working with the assumption that we are deploying an application that has a SQL Azure database and a web component. More complex architectures will have more pieces, but the process will be similar.
SQL Azure Configuration
This is the most simplistic portion of the process, your existing database needs to be expanded to be part of a Failover Group. The definition of a Failover Group enables a set of SQL Server features that manage replication, connectivity and failover for a set of databases. Once completed you should see a definition similar to the following under "Failover Groups" for your primary SQL Azure server.
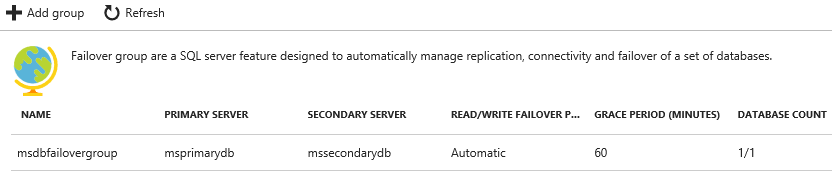
This is as simple as adding the group and selecting the databases that you want to add. As you are creating this a few key configuration elements are exposed that you will want to understand.
- Secondary Server: This will be the secondary SQL Server, if you don't have one you will want to create it. Remember this should be in a different data center than your primary.
- Read/Write failover policy: This governs how/when the failover will happen. The default of "automatic" is recommended for the best performance.
- Read/Write Grace Period: Due to async data synchronization, this sets the amount of time that it will wait if there is a risk of data loss before failing over to the secondary.
Once enabled the process will start and the replication process will copy the database to the needed secondary location(s). Your final change will be to update your application to connect to the database using the "Read/write listener endpoint" that can be found on the failover group information page. It is in the format of {failovergroupname}.databse.windows.net. This ensures that your application does not need any changes to switch between the primary and secondary.
Web Application Configuration
The web application portion of this configuration is quite simple. The simplest approach is to create a new Web Application with the same configuration as your existing application, simply adding this to a new App Service that is located in the same region that your failover group was added to.
Please note your application must be deployed to both app service instances. Applications that have dynamic content created inside of the application will need to have secondary provisions for synchronization. For those using DNN, I'll be posting a secondary DNN specific article discussing this point.
Other application considerations for caching might require the use of a Distributed Cache option and are beyond the scope of discussion at this time.
Azure Traffic Manager
The final piece of the magic behind the Geo-Redundant Availability process is the use of the Azure Traffic Manager. This component provides dynamic DNS based resolution for your application to properly route requests to the service(s) that can best handle the request.
In effect, it is a smart load balancer that exists at a global level. Once created we will follow a few simple steps to configure traffic manager and our domain and we should then be fully setup!
Addition of Endpoints
Endpoints to traffic manager s simply the final destinations of where the traffic will go. You define endpoints by selecting a type and providing a name. The most common practice for this in our cause would be use "Azure Endpoint" as the type and simply select the App Service as the target. When created you can set a priority for the endpoint, which will control preferred locations. Later in the configuration, we will make the selections necessary to determine how this will be applied.
For our sample application, I created two endpoints, Primary & Secondary, pointing to the two app services.
Configuring Traffic Manager Options
Once you have your endpoints defined it is time to configure the routing method to be used, we are presented with four options under the "Configuration" section for Traffic Manager.
- Performance: This uses the endpoint with the lowest latency to a user. (All Endpoints In Use)
- Weighted: This allows you to distribute load using a weighted distribution process, for example, 75% to Endpoint 1, 25% to Endpoint 2. (All Endpoints In Use)
- Priority: This will use the endpoint with the highest priority that is active. (Only 1 endpoint in use until failover)
- Geographic: This will direct the user to the endpoint closest to their geographic region. (All Endpoints In Use)
Additionally, in this configuration we can set the path to monitor for uptime, I recommend using something such as a keepalive page or otherwise, that provides a true health check.
Going Live WIth Geo-Redundant Availability
Once all of the above steps have been completed you can go live with a simple DNS update to your application. Whereby in the past you would point your DNS to the individual App Service you will update this to point to the Traffic Manager. This will initiate the full process and allow your application to function as desired.
Once configured and traffic is flowing you can use manual failover processes to validate that your application does, in fact, stay online when you failover to the secondary data center, or if you take an application offline.
Cost Implications of Geo-Redundant Availability
One of the biggest questions that I often get from customers is around the expected costs of implementing this type of architecture. The monthly costs in Azure are typically 2x that of a non-Geo-Redundant installation plus a small additional amount to cover the costs of the Traffic Manager and the DNS lookups associated.
Wrapping Up
This has been designed to serve as a high-level overview of how you can achieve Geo-Redundancy in your applications with Azure. Each application is slightly different and your development & architecture can impact how easy it is to complete these steps. As always if there are any questions I can answer please don't hesitate to comment below, or reach out to me directly.