Over the past year-and-a-half I have been working to improve the automation in our development processes. It is my desire to always have consistent development, review, and release processes for all customers, regardless of their size. As I worked to leverage Azure DevOps more within our organization I realized that with very little work it is possible to create a build pipeline for DNN Extension development to create a clean process. In this post, we will dig into this process a bit.
Goals with the Pipeline
This posting covers the build pipeline processes and will set up our Extensions for a release process to be later defined. The actual automated release of extensions will be covered in another blog posting due to the requirements for third-party extension installation on the target website. At the end of this posting, we will have a process that does the following.
- Retreives the source code from the repository
- Patches both the AssemblyInfo.cs and .dnn manifest files with the current version
- Builds the project in release mode
- Gathers all _install.zip files and pushes them as artifacts
Assumptions
It is assumed that your project can build without any local dependencies for this process to work. The best way to quickly test is to download the source to a specific location and attempt to build, it should succeed. This is necessary as the Azure DevOps environments use a clean virtual machine for compilation and you do not want to install other items on the environment for speed purposes.
Install Azure DevOps Extensions
To help accomplish the goals of this process I have built a suite of Azure DevOps Tasks that can be re-used. These tasks require little to no configuration and perform tasks that are otherwise either not supported or are complex to configure in DevOps. These are free extensions supported by my company IowaComputerGurus.
You can find & install these items on the Visual Studio Marketplace. You will want both the C# Pipeline Tasks & the DNN Pipeline Tasks from this listing.
Initial Pipeline Configuration
The first part of pipeline configuration is no different than others. Simply select "Add Pipeline" within Azure DevOps and start by configuring the source location and select the ASP.NET Template as your default template. We will customize the tasks next.
Customize The Task Layout
Once you have a default task set up in place, we can work to finalize the tasks needed.
Add Version Patching Tasks
The first thing you will want to do is add two of the ICG custom tasks to the beginning of your process. "Set C# Assembly Version" and "Update DNN Manifest Version". These tasks should be the first two tasks in the Phase, as we want to be sure that these version #s are included in the build process.
In adding these items, no customization is often needed, however, you can review the settings to confirm.
Add Artifact Publishing Tasks
Your pipeline should now have the version patching tasks and the standard build tasks. Our next step is to collect our generated install packages and push them as artifacts.
You will want to add "Copy DNN Extension Artifacts" to your project first. This by default is set up to look in all /packages/ folders for _install.zip files, if you are using a different packaging process you will need to update the search pattern configuration.
The last step will be to add a "Publish Build Artifacts" task to the project. The default of publishing the buildArtifactsStagingDirectory should be acceptable.
Validate Task Order
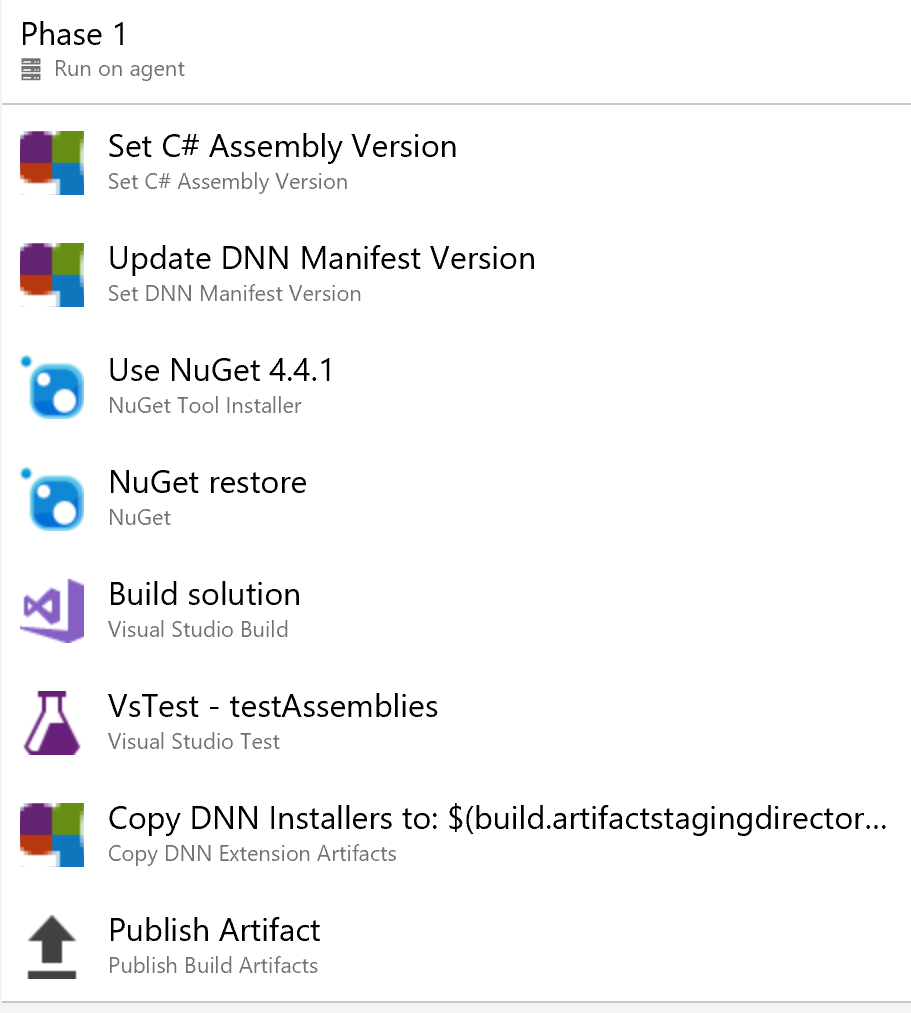
The above is a screenshot from a final configuration. The order of tasks is important to ensure that your project is built with the correct version numbers.
Before you save your pipeline, we have a little more configuration to complete.
Variable Configuration
With the build steps configured, we need to update the variables for our build to properly set the Major and Minor versions. We will use these values combined with the automatically incrementing build number to create a full version number of Major.Minor.Build, which is necessary for proper DNN integration.
On the variables screen simply add two variables "MajorVersion" and "MinorVersion" and set them to your desired value. You can use this section to define any other variables you may need.
Triggers Configuration
On this section, you will want to ensure that Continuous Integration is enabled and add two "Include" options to add the Develop & Master branches. This will ensure that the build is triggered automatically anytime a commit happens to these branches.
Options Configuration
The options screen allows you to configure metadata, view build status images, and other items. You can adjust those settings at your leisure, the key setting we need to change here is the Build Number Format. We want to set this value to "$(MajorVersion).$(MinorVersion)$(rev:.r)" without the quotes, which creates our version number that will have all of the parts necessary.
Save & Test
Once all of the above is complete, save and queue the pipeline, and within a few minutes, you should see a successful build. Once the build is completed you should see your module installation packages listed as artifacts.
In Summary
By following these steps we have established an automated build process that on each commit to our selected branch(es) will build our extensions and collect all of the installation packages.
With this process completed, we now have the ability to trigger a release to complete the entire process. I'll follow-up with a future blog posting regarding release management with DNN.